Introduction
Before modifying a domain’s DNS records in production, it’s wise to verify the site on the new server. This guide presents four methods, ranked by usefulness: from the quickest local test to the most complete clone/staging approach. Choose the method appropriate to your skill level and the site type (static, PHP/WordPress, external application).
Before you start — prerequisites
- Access to your cPanel: required to retrieve the server IP, create a subdomain or modify the DNS zone. See: How do I access my cPanel account?.
- The public IP address of the new server (or the shared IP of the cPanel account).
- Administrator rights on the test computer if you plan to modify the hosts file
hosts. - For dynamic sites: access to phpMyAdmin (or WP Toolkit / Softaculous) to adjust the test URL if necessary. Guides: phpMyAdmin, WordPress Toolkit.
- If the DNS zone is managed at your registrar (outside cPanel), plan to edit the records with that provider.
Method 1 — Modify the hosts file (local test — safest for private testing)
How it works: your computer will use the IP you specify for a domain name. The change is local and won’t affect visitors. Useful to validate the site’s rendering, links and database connections.
Steps (Windows)
- Retrieve the IP address of the new server (see below for how to find it in cPanel).
- Open Notepad as an administrator (right-click → Run as administrator).
- File → Open → C:\Windows\System32\drivers\etc\hosts
C:\Windows\System32\drivers\etc\hosts. Choose "All Files" to view the file. - Add a line at the top of the file:
203.0.113.10 example.com www.example.com(replace the IP and the domain with your own). - Save. Flush the local DNS cache: in an administrator terminal run
ipconfig /flushdns, then refresh your browser (or restart it).
Steps (macOS / Linux)
- Open a terminal and edit:
sudo nano /etc/hosts(or your preferred editor). - Add the same line as above: the IP followed by the domain names separated by spaces.
- Save (Ctrl+O), exit (Ctrl+X). On macOS, run
sudo dscacheutil -flushcacheand, if needed,sudo killall -HUP mDNSResponderOn Linux, the command varies by distribution (e.g.sudo systemd-resolve --flush-cacheson some systems); restarting the browser is a simple alternative.
Important points
- The file
hostsonly affects the machine you change: ideal for private testing. - Emails (MX) remain pointed to the old server until you change the public DNS.
- HTTPS: expect certificate warnings (mismatch) because the server's certificate is not issued for the local IP. To test HTTPS, use a public subdomain (method 3).
- After testing, remove the entry added to
hoststo return to normal DNS routing.
Method 2 — Temporary URL via mod_userdir (http://IP/~username)
If your hosting provider enables mod_userdir, you can open the URL http://IP/~usernameAdvantage: no local changes on workstations. Disadvantage: frequent incompatibilities with some PHP handlers and path-related errors.
Steps
- Ask your hosting provider if they allow access via
http://IP/~username. If you manage the server with WHM, the option is located in Security Center → Apache mod_userdir Tweak. - Open
http://203.0.113.10/~username(example) in your browser.
Limitations
- Common incompatibilities: PHP via CGI/FastCGI, PHP‑FPM and certain modules (e.g. mod_ruid2) can prevent scripts from running correctly; 500 errors may occur.
- SSL: access via IP or a temporary URL triggers a certificate warning.
- Does not always reproduce the exact configuration (paths, document root directories, .htaccess rules based on the hostname).
Method 3 — Create a test subdomain and add an A record (public testing recommended)
The method closest to a real switchover: create test.votredomaine.tld and point its A record to the new IP. You can share the URL with a client and obtain AutoSSL certificates for HTTPS after propagation.
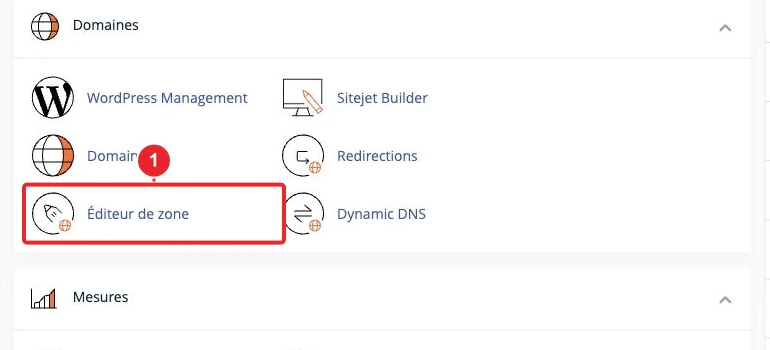
Steps (in cPanel)
- Log in to cPanel (see How to access my cPanel account?).
- Open Zone Editor (Domains → Zone Editor). Select the domain then click Manage.
- Click on Add Record, choose the type A. Fill in:
- Name :
test(this createstest.votredomaine.tld) - Address : the IP address of the new server
- Name :
- Save. Wait for propagation (a few minutes to a few hours depending on caches and TTL).
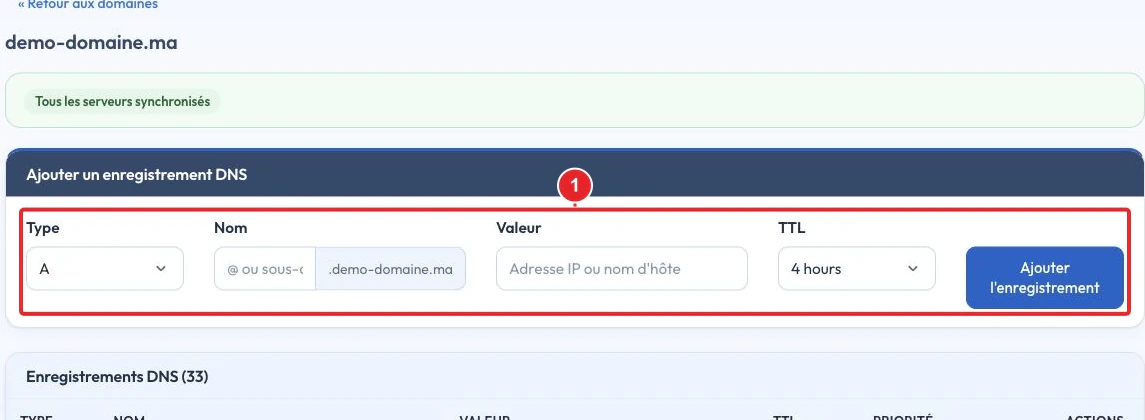
Practical tips
- If the DNS zone is managed at an external registrar, create the A record with that provider.
- To test HTTPS: wait for propagation, then enable AutoSSL (cPanel) on
test.votredomaine.tldto obtain a valid certificate. - Reduce the TTL a few hours before a planned switchover to speed up propagation if you can.
Method 4 — Clone / staging (for WordPress and complex dynamic sites)
For a WordPress site or a complex application, create a copy (clone) on a subdomain: this avoids conflicts with the production version and allows complete functional and performance testing.
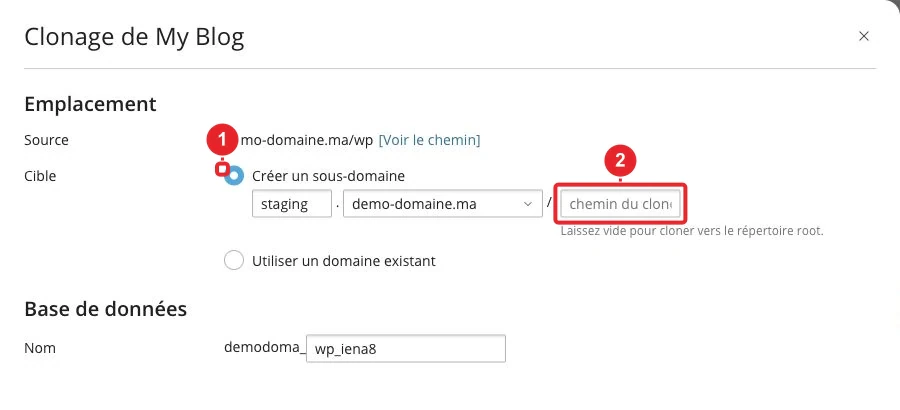
Clone with WP Toolkit (cPanel)
- Open Open WP Toolkit in cPanel and locate the installation to clone.
- Select Clone : specify the destination (subdomain or folder), verify the database and start the cloning.
- After cloning, disable any caching (cache plugins), then test functionality: admin login, forms, payments, etc.
Manual cloning (non-WordPress or if WP Toolkit is not available)
- Copy the files with File Manager or FTP to the test folder (e.g.
test.votredomaine.tld/public_htmltest.votredomaine.tld/public_html). - Export the database via phpMyAdmin and import it into a new database; update the configuration file (e.g.
wp-config.phpwp-config.php). - Update the URLs in the database (WordPress:
siteurlsiteurl and homehomein the wp_options tablewp_options) — use phpMyAdmin to edit with care.
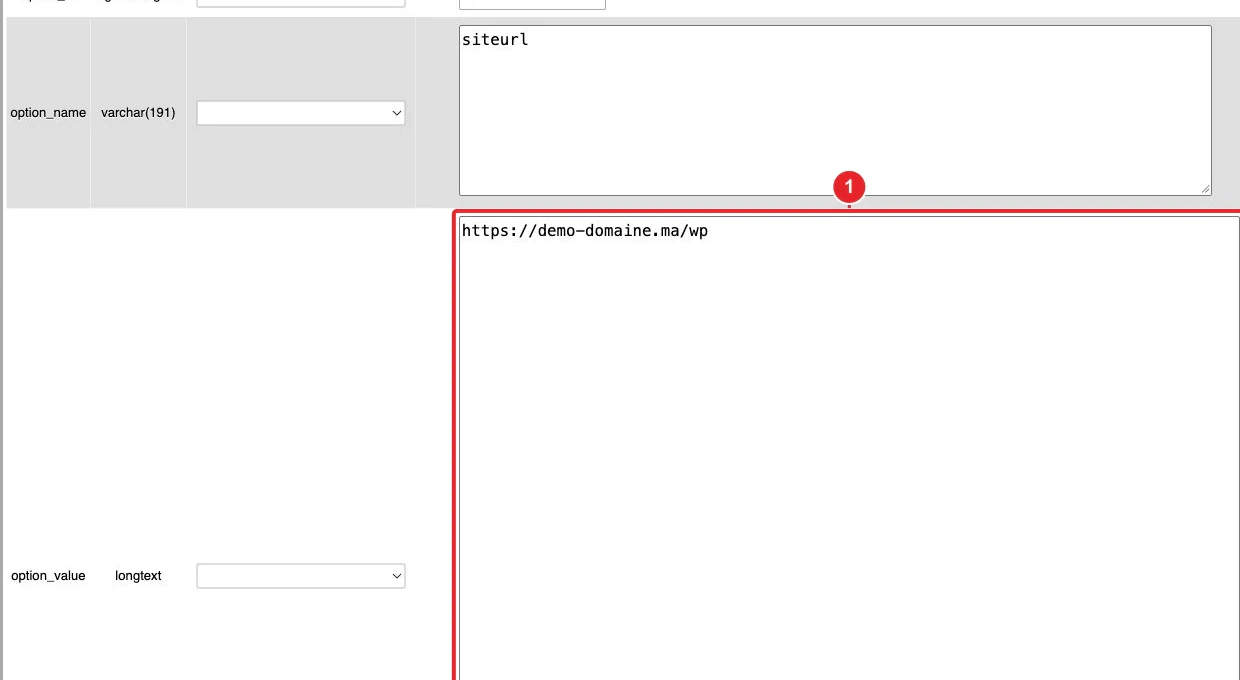
siteurl and home home if the clone is served from a subdomain.Actions to take after testing (checklist)
- Remove the entry added to the hosts file
hostson your test machines. - Delete or reassign the test subdomain if you no longer need it.
- Record the current DNS configuration (A, MX, TXT) before any switchover so you can restore it in case of problems.
- After changing the public DNS records, monitor propagation and email deliverability (MX, SPF/DKIM/DMARC).
Quick troubleshooting
- I still see the old site : check the file
hosts(all test machines), clear the browser cache, clear the application cache (WordPress plugins), and wait for propagation if you added an A record. - 500 error / blank page : check the cPanel error logs (Metrics → Errors) and verify the PHP version in MultiPHP Manager. If the site works via
hostsbut not via mod_userdir, the cause is often an incompatibility with the PHP handler. - HTTPS certificate warning : normal if you test by IP or via
hosts. To validate HTTPS, use a public subdomain and request an AutoSSL certificate after the subdomain points to the server. - Unable to log in to WordPress : update
siteurlandhomevia phpMyAdmin (tablewp_options), remove site-related cookies and disable security/caching plugins if necessary. - External services (OAuth, payments) not working : these services often verify the exact URL. Test on a public subdomain or on publicly accessible staging rather than by
hostslocal.
Important limitations
- Testing via
hostsdoes not reproduce your visitors' experience (public DNS caches, CDNs, rules based on the client's IP, external services verifying the domain). - TLS/HTTPS certificate and HSTS: local tests can hide issues that only the public version will reveal.
- Mod_userdir can exhibit different behaviors (paths, headers) compared to a site served under the real domain name.
Which method should you choose?
- Quick solo test (developer): hosts file
hosts. - Share with a client / QA: subdomain + A record (method 3).
- Verify HTTPS and external services: public subdomain (AutoSSL possible).
- Complex WordPress site: clone/staging via WP Toolkit or Softaculous (method 4).
Internal resources
- How to access my cPanel account?
- How to modify my domain's DNS zone in cPanel
- phpMyAdmin: import / export / modify (e.g. siteurl)
- WordPress Toolkit (cPanel): clone and manage a WordPress site
- Install WordPress (Softaculous)
Summary
For quick, strictly local checks, modify the hostshosts file.
Reference documentation
Documentation consulted on 16 October 2026. Tools may vary depending on your hosting.