Introduction
Google reCAPTCHA reduces automated (bot) submissions on forms by requiring proof of human interaction. There are several modes: reCAPTCHA v2 (visible checkbox or invisible) and reCAPTCHA v3 (score returned client-side). The choice depends on the form: simplicity (v2) versus transparency and score-based detection (v3).
Prerequisites
- A Google account to access the reCAPTCHA console and create your keys (site key + secret key).
- Access to the site's administration: WordPress (wp-admin) or file access via cPanel (File Manager) or FTP.
- Access to cPanel to upload a plugin (.zip), open WP Admin via WP Toolkit, or manage files, DNS and IP blocks.
- HTTPS enabled on the domain (recommended) — check the SSL certificate in cPanel if necessary.
Which mode to choose? (summary)
- reCAPTCHA v2 (checkbox): visible and reliable, a good option for most contact forms.
- reCAPTCHA v2 invisible: no visible checkbox; triggered on submit but may confuse some visitors.
- reCAPTCHA v3: invisible, returns a score (0.0–1.0) that you must interpret server-side — useful for automated decisions but requires threshold logic and additional testing.
Recommended integration — WordPress (plugin)
If your site runs on WordPress, the simplest option is to use a plugin that handles the client-side widget and the server-side verification.
Steps (WordPress)
- Create the reCAPTCHA keys
- Open the reCAPTCHA console (Google), add a label, choose the type (v2/v3) and register your domain. Retrieve the site key (public) and the secret key (private).
- Access the WordPress administration
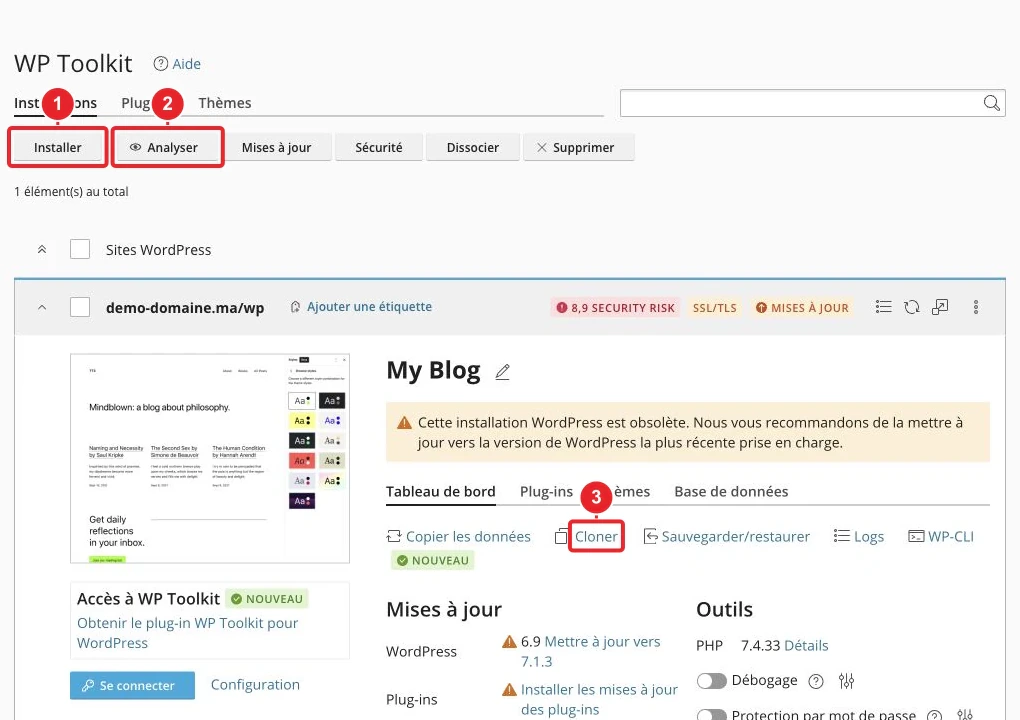
- If you use WP Toolkit in cPanel, open your installation then click “Open Admin” to access wp-admin. See screenshot below.
- Install the reCAPTCHA plugin
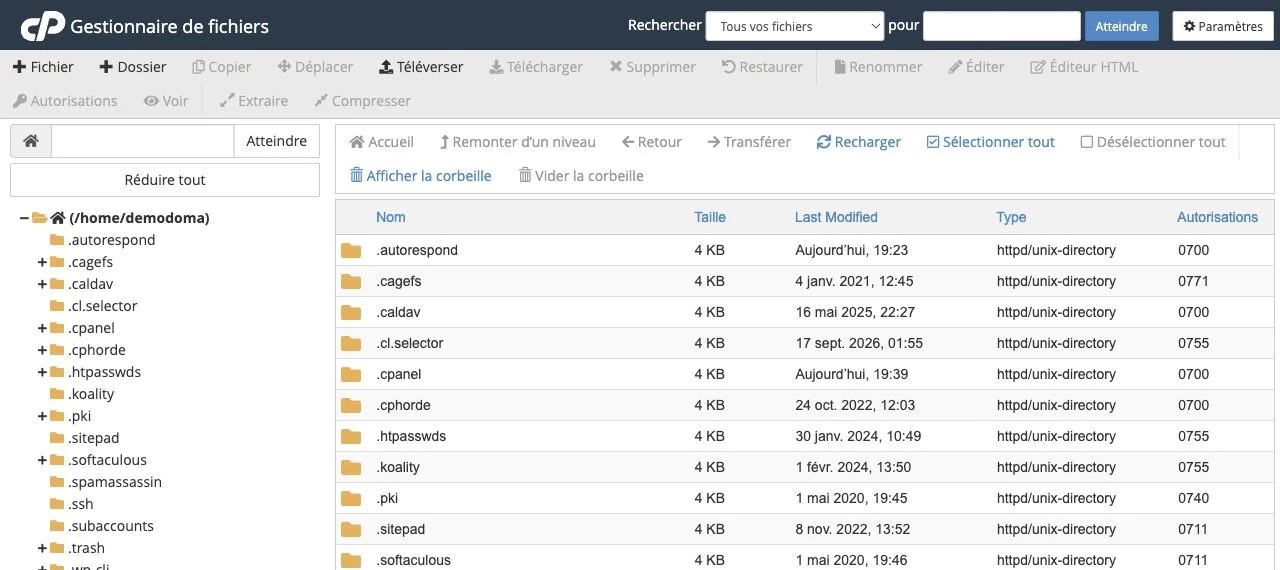
- In WordPress: Plugins → Add New, search for 'reCAPTCHA' (or upload the plugin .zip from cPanel if you prefer). To upload via cPanel, open the File Manager and upload the plugin into
wp-content/plugins. (Screenshot below.)
- In WordPress: Plugins → Add New, search for 'reCAPTCHA' (or upload the plugin .zip from cPanel if you prefer). To upload via cPanel, open the File Manager and upload the plugin into
wp-content/plugins.- Configure the plugin
- Paste the site key and the secret key into the plugin settings, choose v2 or v3 according to your needs, and enable the integration for your forms (globally or per form, depending on the plugin).
- Test
- Open the form in private/incognito mode and perform several tests: successful submission, failing submission (without token), and verify server-side logging.
If you need a guide on using WP Toolkit or accessing cPanel: WP Toolkit (cPanel) · Access cPanel (internal links).
Manual integration (non‑WordPress site)
For a custom form, add the client-side widget then verify the token server-side.
Steps (manual)
- Create the keys in the reCAPTCHA console (Google) and note the site key + secret key.
- Add the client script and the widget (e.g. reCAPTCHA v2 checkbox) to the HTML page containing the form:
<script src="https://www.google.com/recaptcha/api.js" async defer></script>
<form method="post" action="/traitement-form.php">
  <!-- champs de votre formulaire -->
  <div class="g-recaptcha" data-sitekey="VOTRE_SITE_KEY"></div>
  <button type="submit">Envoyer</button>
</form>
- Verify on the server side (PHP example with cURL):
<?php
$recaptcha_secret = 'VOTRE_SECRET';
$recaptcha_response = $_POST['g-recaptcha-response'] ?? '';
$remoteip = $_SERVER['REMOTE_ADDR'] ?? '';

$ch = curl_init('https://www.google.com/recaptcha/api/siteverify');
curl_setopt($ch, CURLOPT_POST, true);
curl_setopt($ch, CURLOPT_POSTFIELDS, http_build_query([
  'secret' => $recaptcha_secret,
  'response' => $recaptcha_response,
  'remoteip' => $remoteip,
]));
curl_setopt($ch, CURLOPT_RETURNTRANSFER, true);
$response = curl_exec($ch);
curl_close($ch);

$decoded = json_decode($response, true);
if (!empty($decoded['success'])) {
  // CAPTCHA validé → traiter le formulaire
} else {
  // Échec → rejeter et afficher un message
}
?>
Note: for reCAPTCHA v3, also check $decoded['score']
$decoded['score']and apply a threshold (e.g. 0.5) adjusted after testing.
Checks to perform
- The domain registered in the reCAPTCHA console exactly matches the domain where the widget is loaded (errors 'Invalid site key' often occur when the domain and keys don't match).
- The client script (
https://www.google.com/recaptcha/api.jshttps://www.google.com/recaptcha/api.js) is included and not blocked by an ad blocker (adblock) or a CSP rule. - Server-side verification calls the URL https://www.google.com/recaptcha/api/siteverify
https://www.google.com/recaptcha/api/siteverifyand the JSON response contains"success": true"success": true. - Test in private browsing and on multiple browsers, and verify that JavaScript is enabled.
Common troubleshooting and actions in cPanel
- Invalid site key / No widget displayed — confirm that the site key indeed belongs to the current domain (no extra spaces and the correct environment: www vs non‑www). Check the browser JS console for errors.
- Widget absent — a security plugin, a CDN or a CSP rule may block the Google script. Temporarily disable security extensions to test.
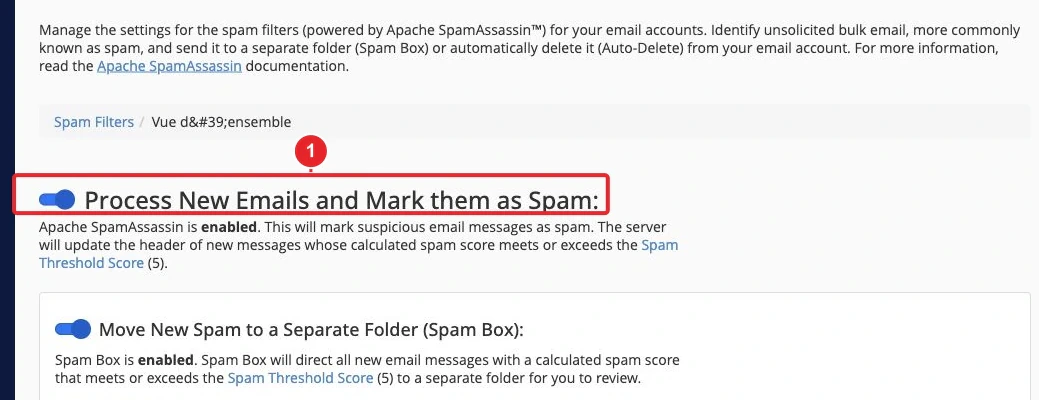
- Many unwanted submissions despite reCAPTCHA — combine reCAPTCHA with server-side filters: SpamAssassin and cPanel filtering. Open the antispam filters in cPanel to adjust the threshold or automatic deletion (screenshot below).
- Block recurring IP addresses — if you identify IPs generating spam, block them via cPanel's IP Blocker (screenshot below) or use Imunify360 if available.
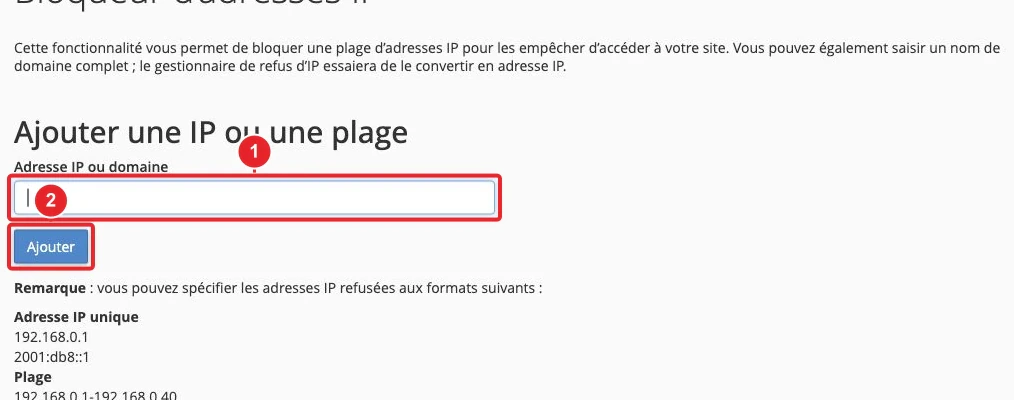
Useful internal links: SpamAssassin in cPanel · Block an IP (cPanel) · Imunify360 (if available).
Additional measures if spam persists
- Honeypot: a hidden field in the form that only bots fill — reject the submission if it’s filled.
- Rate limiting: block after X attempts over a period (via a server-side script, .htaccess or cron analysis tasks).
- Double email verification: send a confirmation link before final processing of the data.
- Monitor logs and adapt rules (cPanel → Resource Usage / Access Tracking).
Limits and privacy
reCAPTCHA sends signals to Google (telemetry and behavioral analysis) to determine the verdict. Inform your visitors in your privacy policy and check GDPR compliance according to your jurisdiction. If third-party data collection is a concern, consider other solutions (honeypot, self-hosted CAPTCHA) and document your choice.
Quick checklist before going live
- Keys (site key + secret) created and correctly copied into the plugin or the code.
- Visible widget or call to
grecaptcha.execute()grecaptcha.execute() for v3. - Server-side verification implemented (call to siteverify and test of
successsuccess). - Tests in private browsing, on mobile and across multiple browsers.
- Fallback plan: honeypot, IP blocking and adjustment of antispam filters if necessary.
Public resources (limited selection)
- Official reCAPTCHA help — Google (key creation and modes).
- cPanel Knowledge Base — preventing contact form abuse.
- WordPress Directory — reCAPTCHA plugins (examples).
Need help?
We can:
- prepare the configuration for a specific WordPress plugin (specify the plugin name),
- investigate a specific error on your form (provide the URL and a screenshot of the console or the message),
- or create/adapt the PHP verification script for your form.
Reference documentation
- How can I prevent contact form abuse? — cPanel Knowledge Base
- reCaptcha by BestWebSoft — WordPress plugin (directory)
Documentation consulted on October 16, 2026. Tools may vary depending on your hosting.