MX (Mail Exchanger) is the DNS record responsible for redirecting emails sent to your domain to a specific server. You can manage these DNS records from your cPanel account via the Zone Editor interface and define the server receiving by adding its own MX records. There is also another tool that allows you to set up how mail is handled, we’re talking about Email Routing tool.
This article walks you through how to properly configure MX records and select the right email routing option for your setup.
Table of Contents
Access the Zone Editor
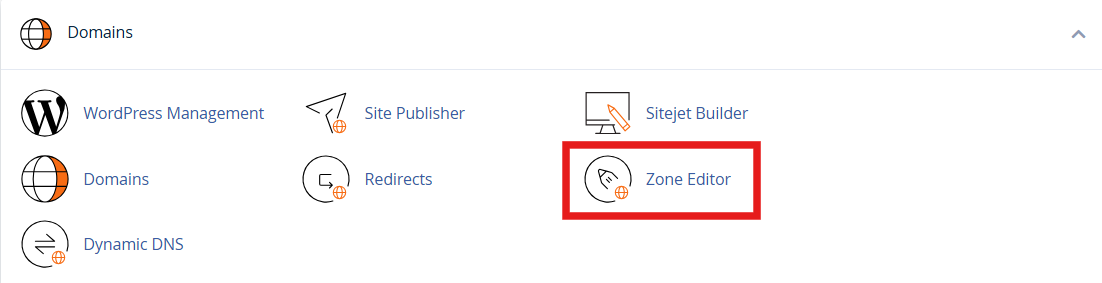
- Log in to your cPanel account.
- Scroll to the Domains section and click on Zone Editor.
- Find the domain you want to configure, then click Manage or MX Record next to it.
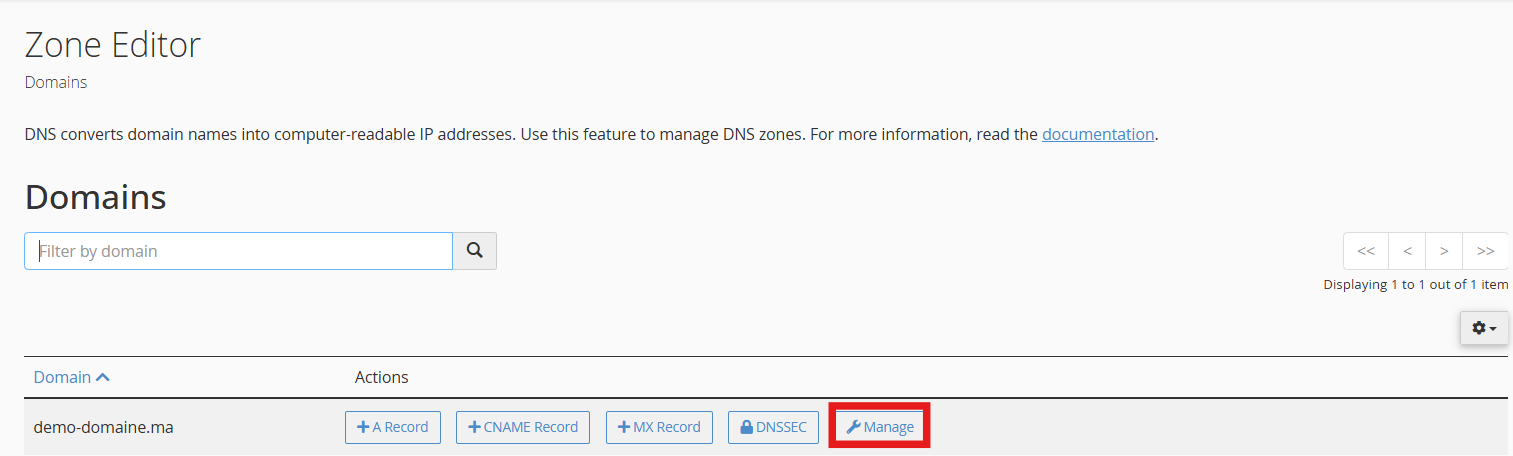
This will take you to a list of DNS records associated with your domain.
Add or Modify MX Records
MX records tell the internet where to send emails for your domain. You may need to add, edit, or delete records depending on your email setup.
The default MX record for all hosted domains is mail.yourdomain.tld
If you would like to use a third-party mail service for your domain, you need to remove existing MX records for your domain and then to add a new MX record:
-
- Click Add Record and select MX from the record types.
- Set the Priority. Lower numbers mean higher priority. For example, a priority of 0 is considered the highest.
-
- Enter the Destination, which must be a valid mail server hostname (like mail.yourdomain.com or aspmx.l.google.com).
- Click Save Record to apply the changes.
To edit an existing MX record, click Edit next to the record, make your changes to the priority or destination, and save.
To delete a record you no longer need, click Delete and confirm.
Make sure that the destination points to a live mail server and that the domain name is fully qualified (i.e., ends with a dot, like mail.yourdomain.com.).
For detailed instructions on how to manage the DNS zone through your cPanel account, please refer to this guide : How to change the DNS zone of my domain name on cPanel
Configure Email Routing
Once your MX records are in place, you need to tell cPanel how to handle incoming mail.
By default, Email Routing is set to Local for all hosted domains
To configure email routing :
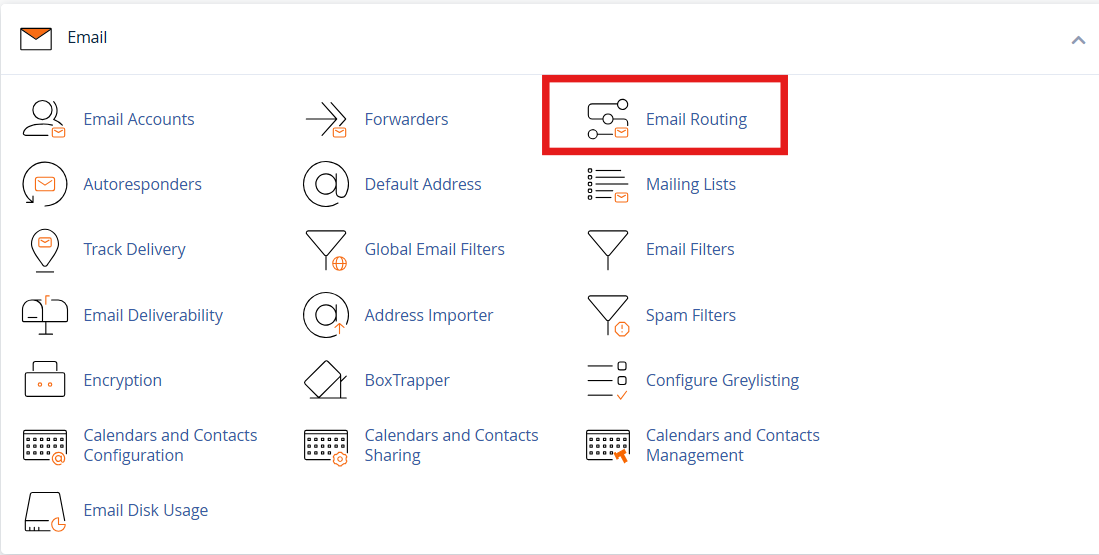
- Go back to the main page of cPanel.
- Under the Email section, click on Email Routing.
- Choose your domain from the drop-down menu if prompted.
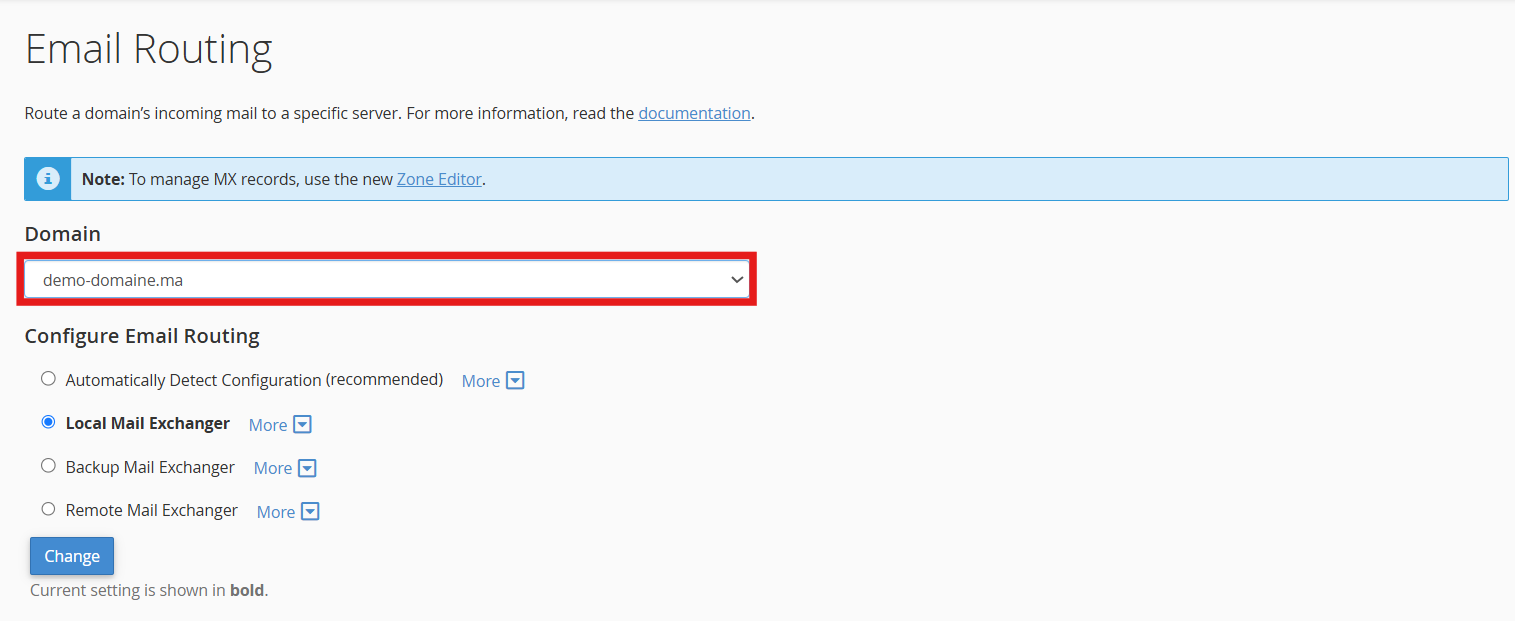
You will now see four routing options:
- Automatically Detect Configuration: cPanel checks your DNS zone and tries to choose the best option. However, it only looks at the local DNS zone, not external DNS, so it’s best to set this manually in most cases.
- Local Mail Exchanger: Use this option if your domain’s mail is hosted on the same server where your website is hosted (i.e., cPanel should accept incoming mail locally).
- Remote Mail Exchanger: Choose this if you’re using a third-party email provider like Google Workspace, Zoho Mail, or Microsoft 365. In this case, cPanel will not attempt to accept incoming mail.
- Backup Mail Exchanger: This setting allows your server to act as a backup. It will store incoming mail temporarily and try to forward it later to the main mail server when it becomes available.
After selecting the correct option, click Change to apply the settings.
Match Routing With MX Records
It’s important that your email routing setting matches the MX records you’ve configured. For example, if your MX records point to Google’s servers, you should select Remote Mail Exchanger. If your MX records point to your own domain or server, choose Local Mail Exchanger.
Misalignment between MX records and the email routing setting can cause mail to bounce, go undelivered, or be incorrectly processed. Double-check both configurations if your mail is not working as expected.
Verify and Test
After updating your MX records and routing settings:
- Use a DNS lookup tool like MXToolbox to confirm your MX records are publicly visible.
- Send test emails to and from your domain to make sure messages are delivered correctly.
- Keep in mind that DNS changes may take up to 48 hours to fully propagate across the internet.
If you’re still not receiving mail, make sure your DNS zone has the right MX record, that the destination mail server is working, and that your routing option in cPanel matches your MX configuration.
Need Help?
If you’re unsure which settings to use or your mail is not working properly, reach out to your hosting provider or email service provider. They can give youthe exact MX records you should use and help you set up your routing correctly.