Installing a Rapid SSL certificate on cPanel can seem challenging, especially for the first time. This guide will assist you in installing a Rapid SSL certificate on cPanel hosting. Follow the steps below to ensure a successful installation.
Table of Contents
What is SSL?
SSL/TLS is a data encryption protocol that creates a secure channel between a web browser and a server. It is used to encrypt sensitive information transmitted between the user and the website, preventing attackers from intercepting and deciphering it.
Cap Connect offers a free SSL certificate for its clients with all hosting plans. The SSL certificate can be easily activated from the cPanel interface.
What is Rapid SSL?
Rapid SSL is a popular certification authority that provides SSL/TLS certificates to secure websites and establish encrypted connections.
Rapid SSL certificates are generally used to secure small websites, blogs, personal sites, and testing or development environments. They offer basic encryption and assure visitors that their shared information is transmitted securely. Rapid SSL certificates are issued quickly and at a relatively low cost, making them a popular choice for websites that do not handle significant financial transactions or sensitive data.
Step 1: Obtain the Rapid SSL Certificate
Purchase a Rapid SSL certificate at this link.
During the purchase process, provide the required information, such as your domain name and contact details. After completing the purchase, you will receive an email containing the certificate files, typically including the main certificate and the private key.
Step 2: Access cPanel and the SSL/TLS Manager
Log in to your cPanel hosting account using your username and password.

Once logged in, go to the “Security” section and click on “SSL/TLS.”

Step 3: Generate a Certificate Signing Request (CSR)
In the SSL/TLS page, click on “Generate, view, or delete SSL certificate signing requests.”

Fill out the required information, such as your domain name, organization details, and email address.

Click “Generate” to create the CSR. Be sure to copy the generated CSR code, as you will need it during the certificate activation process.
Step 4: Activate the Rapid SSL Certificate
Return to the email received from Rapid SSL containing your certificate files. Follow the provided instructions to activate the certificate. This typically involves accessing a link provided in the email and pasting the CSR code generated in the previous step.
Step 5: Install the SSL Certificate in cPanel
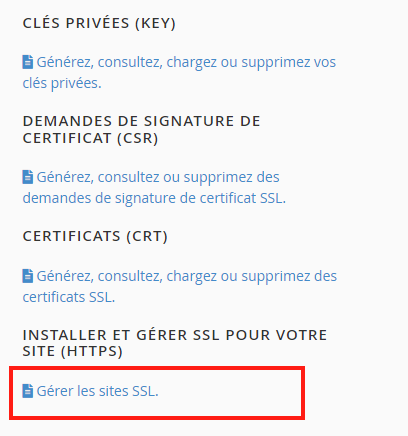
In the SSL/TLS Manager in cPanel, click on “Manage SSL sites.”

Locate the domain name for which you want to install the SSL certificate. Click “Browse Certificates” and select “Choose Certificate File” or “Upload Certificate File.”

Upload the main certificate file received from Rapid SSL. If you have a private key, paste it into the designated field or upload the key file if available.

Click the “Install Certificate” button to complete the installation process.
Step 6: Verify the SSL Certificate Installation
After installing the SSL certificate, access your website using HTTPS (e.g., https://www.yourdomain.com). Verify that the browser displays a padlock or similar indicator showing a secure connection. Test different pages and sections of your website to ensure the SSL certificate is working correctly.
Conclusion:
By following the steps outlined in this knowledge base, you should be able to successfully install a Rapid SSL certificate on your cPanel hosting environment. Remember to keep your SSL certificate updated and renew it before expiration to ensure secure connections for your website visitors.