Quick summary: Composer is the dependency manager for PHP projects. On cPanel, you must run Composer from the command line (Terminal or SSH) and have certain PHP extensions/options available. Depending on your hosting type, you can install Composer globally (requires root access) or locally in your project directory (recommended on shared hosting).
Before you begin — prerequisites
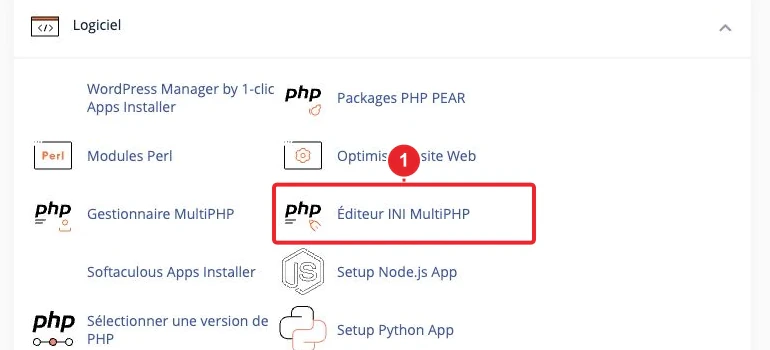
- SSH access or access to the cPanel Terminal (cPanel → Home → Advanced → Terminal). If the Terminal option is disabled, ask your hosting provider. To find out how to access cPanel, see our internal guide: How to access my cPanel account.
- If you install Composer for all accounts: root access
root(VPS / dedicated server). On shared hosting: install Composer locally in your user directory (no root required). - Required PHP extensions:
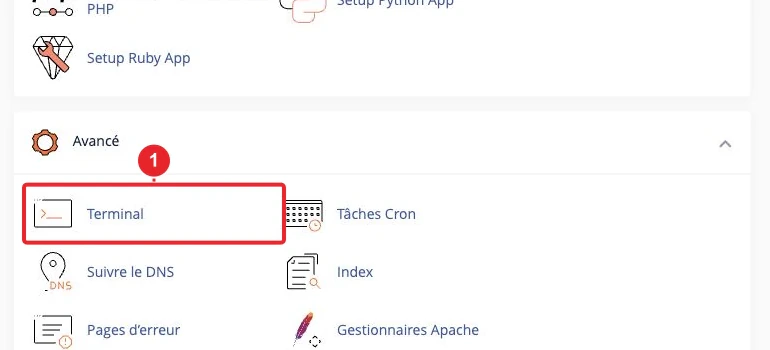
phar(usually available), andmbstringoriconv. Check/enable them via PHP Selector or MultiPHP (see: How to change the PHP version and extensions). - Useful PHP directives:
allow_url_fopen = Onand (for very old versions)zend.detect_unicode = Off. If you cannot modifyphp.ini, there are workarounds (see below). - On CloudLinux servers protected by CageFS: the administrator must expose the Composer binary to CageFS accounts (procedure shown below).
Choose the method
Two approaches:
- Global installation (root) — the administrator installs Composer for all accounts (useful on VPS/dedicated).
- Local installation (without root) — install Composer in your user or project directory. Recommended on shared hosting.
Method A — Global installation (root administrator)
Procedure to make Composer available system-wide.
- Connect via SSH as
root:ssh [email protected](replaceexample.comand the user according to your configuration). - Verify that the CLI version of PHP used by Composer provides
pharandmbstring/iconv, and thatallow_url_fopenis enabled. The administrator can adjust these options via the MultiPHP INI Editor or EasyApache 4 if necessary. - Download and verify the official Composer installer, then install it into
/usr/local/bin:
After installation,cd /tmp php -r "copy('https://getcomposer.org/installer', 'composer-setup.php');" EXPECTED_SIG=$(php -r "echo trim(file_get_contents('https://composer.github.io/installer.sig'));") php -r "if (hash_file('sha384', 'composer-setup.php') === '$EXPECTED_SIG') { echo 'Installer verified'.PHP_EOL; } else { echo 'Installer corrupt'.PHP_EOL; unlink('composer-setup.php'); exit(1); }" php composer-setup.php --install-dir=/usr/local/bin --filename=composer rm composer-setup.php/usr/local/bin/composermust be executable. (If necessary:chmod +x /usr/local/bin/composer.) - Verify the installation:
composer --version. - If the server uses CloudLinux + CageFS, expose Composer to CageFS accounts: create a configuration file and update CageFS (command executed as root):
This step makes the binary accessible to users jailed by CageFS.cat > /etc/cagefs/conf.d/composer.cfg <<'EOF' [composer] comment=Composer paths=/usr/local/bin/composer EOF cagefsctl --force-update
Method B — Install Composer locally (no root) — recommended on shared hosting
Install Composer in your project directory or your home directory and run it as your cPanel user.
- Open the cPanel Terminal or connect via SSH using your cPanel account.
- Change to the project directory (e.g. ~/public_html/mon-projet
~/public_html/mon-projet) :cd ~/public_html/mon-projet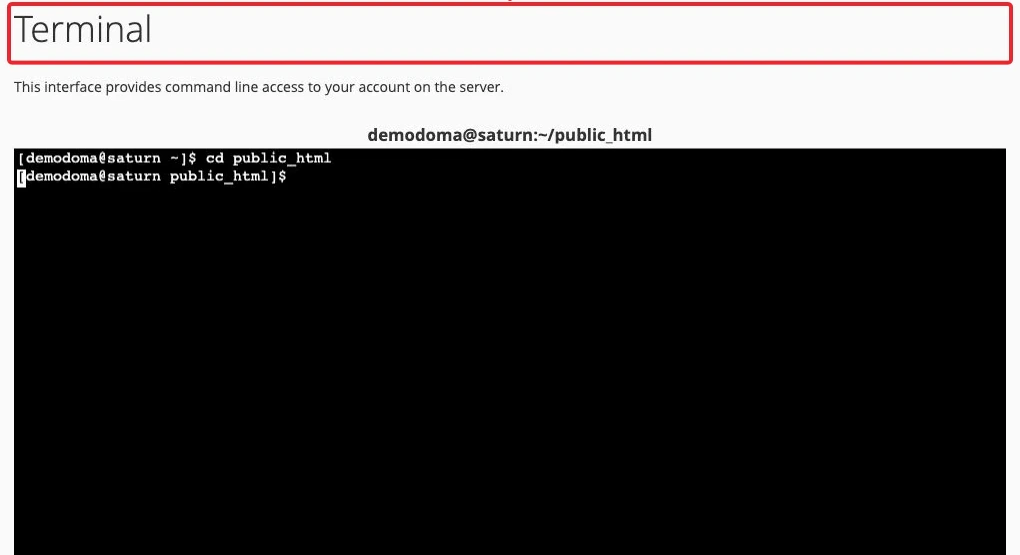
Change to the project root before installing dependencies. - Download the installer and create composer.phar
composer.pharin the current directory:
Run Composer locally with php composer.pharphp -r "copy('https://getcomposer.org/installer', 'composer-setup.php');" php composer-setup.php php -r "unlink('composer-setup.php');" # Résultat : composer.phar dans le répertoire courantphp composer.pharor create an alias (next step). - To run Composer as a regular command, two simple options:
- Create an alias (temporary / for the current user):
echo "alias composer='php ~/public_html/mon-projet/composer.phar'" >> ~/.bashrc source ~/.bashrc - or move it and make it executable in
~/.local/bin~/.local/bin or ~/bin~/binand add that directory to the PATHPATH:mkdir -p ~/bin mv composer.phar ~/bin/composer chmod +x ~/bin/composer # si nécessaire, ajoutez au PATH echo 'export PATH="$HOME/bin:$PATH"' >> ~/.bashrc source ~/.bashrc
- Create an alias (temporary / for the current user):
Run Composer when you cannot modify php.ini
If you do not have the ability to edit php.ini php.iniyou can force PHP directives on the command line:
php -d allow_url_fopen=1 -d zend.detect_unicode=0 composer.phar installzend.detect_unicode applies to very old PHP versions; on recent versions the directive no longer exists.
Useful commands
composer --version— displays the Composer version.composer diagnose— self-diagnostic tool to detect configuration issues.composer install— installs the dependencies listed incomposer.json.composer update— updates dependencies while respecting their constraints.composer self-update— updates Composer itself (only for the copy you manage).- If you encounter a memory error:
COMPOSER_MEMORY_LIMIT=-1 composer install
Troubleshooting — common errors and solutions
1) "command not found"
Cause: the binary composer is not in the PATH. Solutions:
- If you installed it globally: check that
/usr/local/binis in thePATHor run it directly/usr/local/bin/composer --version. - If you have a local copy: add the folder containing
composer(e.g.~/bin) to thePATHin~/.bashrcandsource ~/.bashrc, or create an alias.
2) Warning "Composer should be invoked via the CLI version of PHP, not the cgi-fcgi SAPI"
Meaning: the PHP interpreter invoked by composer is the SAPI used by the web server (cgi/fcgi) rather than the CLI binary. Solution: explicitly invoke the PHP CLI binary. Example (replace the version):
/opt/cpanel/ea-php74/root/usr/bin/php ~/bin/composer diagnosescl enable ea-php74 'composer diagnose' (available only if SCL is installed).
3) Composer uses the wrong PHP version
Cause: php on the PATH points to another version. Solution: call the full CLI binary (absolute path) as shown above or adjust the alias to point to the correct CLI binary.
4) "Composer could not find a composer.json file"
Make sure you are in the folder containing composer.json (project root) before running composer install.
5) Write errors in vendor/ or permission denied
Check that you run Composer as the user who owns the web files (do not run Composer as root on a web project). Fix ownership if necessary:
chown -R votre_user:votre_user vendor/6) CageFS (CloudLinux) related issues
If CageFS blocks access to the Composer binary, ask the administrator to add Composer to the CageFS configuration and run cagefsctl --force-update (see procedure above).
Best practices and security
- Do not run
composer installorcomposer updateasrooton a web project: some packages may run post-install scripts that execute with the same privileges. - For a production site: use
composer install --no-dev --optimize-autoloaderand keepcomposer.lockin your version control system to ensure reproducible dependencies. - If you automate installations (CI/CD), limit the risks with
--no-plugins --no-scriptswhen necessary and verify the imported packages.
Useful internal links
- How to access my cPanel account — to open the Terminal or connect via SSH.
- How to change the PHP version and extensions — to enable
mbstringmbstring, pharphar, etc.
Resources and references
- How to Set Up PHP Composer — cPanel Documentation
- How to install composer on cPanel version 130 and higher — cPanel Support
- How To Update Composer On My Server? — cPanel Support
Need help? If you prefer our team to perform the installation on a VPS/dedicated server or to check the CageFS configuration, open a ticket specifying the target PHP version and whether the server uses CloudLinux/CageFS. On shared hosting, a local installation in your project folder remains the recommended method.
Reference documentation
- How to Set Up PHP Composer — cPanel & WHM Documentation
- How to install composer on cPanel version 130 and higher — cPanel Support
Documentation consulted on October 17, 2026. Tools may vary depending on your hosting.