WP Toolkit is a centralized administration tool integrated directly into your cPanel account, designed to help you manage all of your WordPress websites without having to log in individually to the traditional wp-admin interface of each installation. With this tool, managing essential components such as plugins and themes becomes a smooth, fast, and secure operation, while also allowing you to perform remote maintenance tasks even when one of your websites is experiencing a major technical issue.
Table of Contents
Accessing the WP Toolkit Management Interface
To access the global management interface for your plugins and themes, first log in to your cPanel account.
- In the left-hand navigation sidebar, click WordPress Management or navigate to Tools and then WP Toolkit.

- On the WP Toolkit main page, locate the tab bar displayed below the tool title.
- Switch between the Installations, Plugins, and Themes tabs to access the corresponding management features.

Managing Plugins in WP Toolkit
Plugins extend the core functionality of WordPress by adding features such as form security, cache optimization, or e-commerce capabilities.
1. View and Filter Installed Plugins
When you open the Plugins tab, WP Toolkit displays all plugins detected on your hosting account.
-
Name and Version: The Name column shows the plugin’s official name along with the version currently running on the server.
-
Installation Location: The Installed at column indicates the website path where the plugin is installed, as well as its status (for example, inactive) if the plugin is installed but disabled.
-
Search Filters: Use the search bar located in the upper-right corner to find a specific plugin or click the Filter button to refine results based on status or a particular WordPress installation.

2. Install or Upload New Plugins
WP Toolkit eliminates complex file management by allowing you to add plugins directly from its interface.
-
Install from the Official Repository: Click the Install button in the top toolbar to open a dialog window where you can search the official WordPress repository and deploy the selected plugin to one or multiple WordPress installations with a single click.
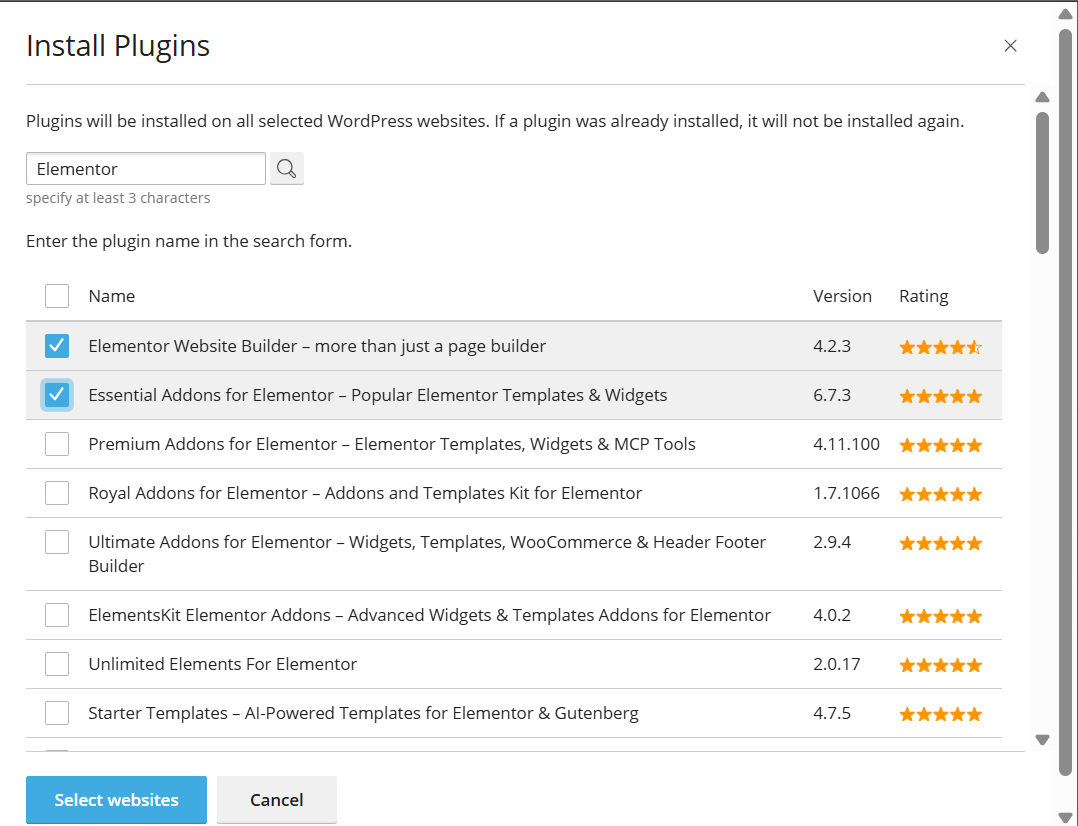

-
Upload External Plugins: If you have obtained a plugin from a third-party vendor as a compressed archive, click Upload Plugin, select the .zip file from your computer, and let WP Toolkit automatically upload, extract, and install it on your server.

3. Activate, Deactivate, and Remove Plugins
To manage plugin behavior without accessing the WordPress admin dashboard:
-
Select the checkbox corresponding to the plugin you want to manage (or use the top checkbox to select all plugins).
-
Click Activate to enable the plugin, or Deactivate to disable it while preserving its configuration.
-
If a plugin is no longer needed, select it and click Uninstall to permanently remove it from your hosting account.

4. Update Plugins
Since website security depends heavily on running up-to-date software, WP Toolkit automatically identifies available updates and displays a warning message accompanied by an alert icon under outdated plugins (for example, A new version is available).
-
To update a specific plugin, click the [Update to version X.X.X] link displayed directly below its name.
-
Before updating, it is strongly recommended to review the [Changelog] to understand the modifications introduced by the developers.

-
To update multiple plugins at once, select them and click the Update button located in the top action bar.
Managing Themes in WP Toolkit
A theme defines your website’s visual appearance, layout, and template structure. The Themes tab provides management options similar to those available for plugins.

1. Identify and Select the Active Theme
A WordPress website can only use one active theme at a time, although multiple themes can remain installed.
-
In the Themes tab, check the Installed at column to see which theme is used by each installation. The (active) label appears next to the domain name to indicate the theme currently displayed to visitors.
-
To switch to another installed theme, locate the desired theme and click the Activate button on the right-hand side.
2. Install and Upload New Themes
-
Quick Search and Installation: The Install button allows you to browse free themes available in the official WordPress repository and deploy them instantly.
-
Upload a Custom Theme: To install a premium theme purchased from a third-party provider, click Upload Theme, select the .zip archive from your computer, and WP Toolkit will automatically install it.
3. Update and Remove Outdated Themes
Like plugins, outdated themes can expose your website to security vulnerabilities.
-
When a new version becomes available, a notification appears beneath the theme name (for example, A new version is available. [Update to version X.X]).
-
You can update the theme immediately by clicking [Update to version X.X] or by selecting the theme and clicking the Update button at the top of the page.
-
To free up disk space and reduce security risks, consider removing unused themes (such as Twenty Twenty-Three or Twenty Twenty-Four) by selecting them and clicking Uninstall.
Best Practices for Safe Maintenance
To ensure smooth and secure administration when using WP Toolkit, we recommend following these best practices:
-
Always Create a Backup First: Before updating plugins or themes through WP Toolkit, make sure to perform a complete backup of your files and database so that you can restore your website if compatibility issues arise.
-
Remove Inactive Components: Disabled plugins and themes still leave their PHP files on the server. If these files contain exploitable vulnerabilities, attackers may be able to take advantage of them. Remove components that you no longer use.
-
Verify Compatibility Before Major Updates: When upgrading between major versions (for example, from version 1.x to 2.x), carefully review the Changelog to identify potential compatibility issues with other plugins, themes, or your active PHP version.