The importance of online security has increased. It is no longer sufficient to rely only on a strong password due to the increase in hacking attempts and data breaches. Passwords are crucial because they can be stolen, guessed, or intercepted.
By requiring both your password and a time-sensitive code produced by an authenticator app on your smartphone, 2FA adds an additional degree of security. Without this code, even if someone were to figure out your password, they would still be unable to access your account.
2FA is supported by cPanel, a popular web hosting management system. It is easy to enable and can greatly improve the security of your website and account information. Although the process is simple, following each step carefully ensures you don’t run into login issues later.
Before you begin, make sure you have an active cPanel account and a compatible authenticator app installed on your mobile device. Popular options include Google Authenticator, Duo Mobile, and Authy, all of which are free and available for both Android and iOS.
Table of Contents
Prerequisites
Make sure your authenticator app is installed and ready before you begin, and that you can access your cPanel account. These applications produce the time-based codes needed for two-factor authentication, which are crucial for the setup procedure.
Step-by-Step Setup
- Log in to cPanel
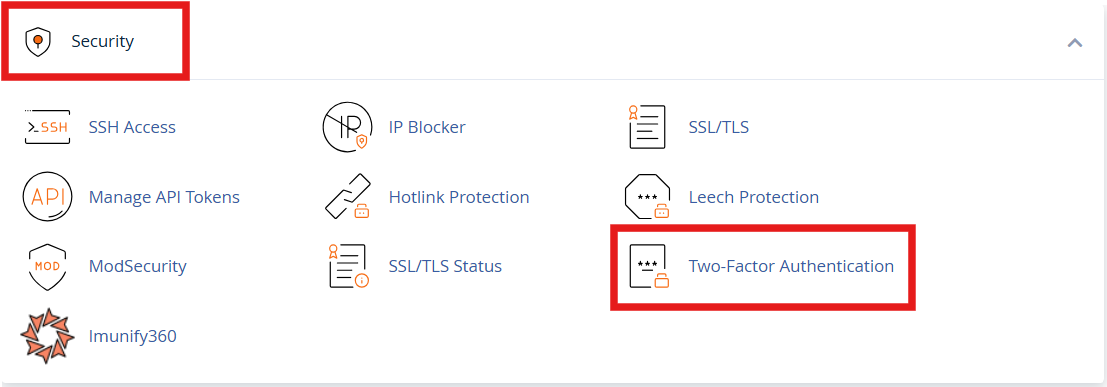
- Access the Two-Factor Authentication Section
Once logged in, navigate to the Security section of the cPanel dashboard, then click on Two-Factor Authentication.
- Initiate the Setup Process
Click on Set Up Two-Factor Authentication.
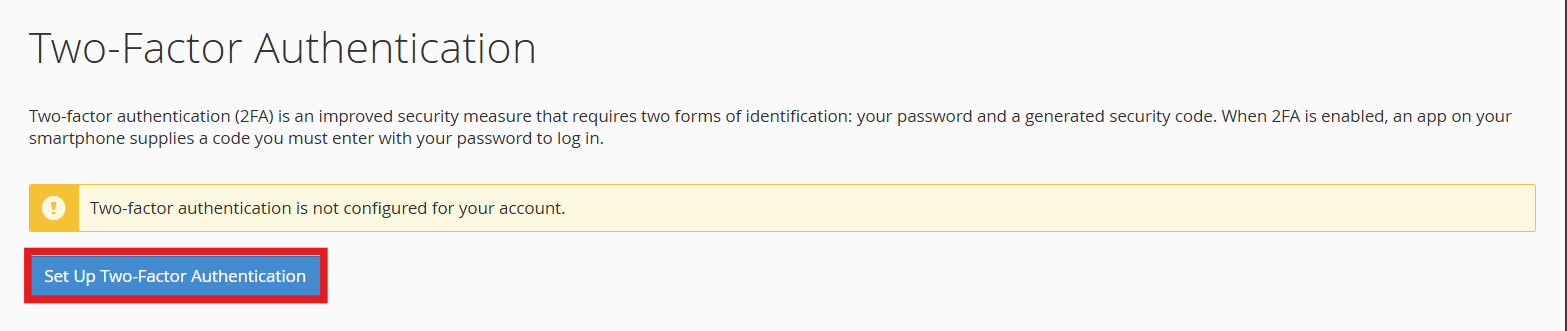
cPanel will display a QR code and offer an option for manual entry in case your app cannot scan the code.
- Configure Your Authenticator App
Option A: Scan the QR Code
Open your authenticator app on your smartphone and add a new account by scanning the QR code displayed in cPanel. This is the quickest method and helps avoid typing errors.
Option B: Manual Entry
If you cannot scan the QR code, select the manual entry option and type in the account name and key provided by cPanel into your app.
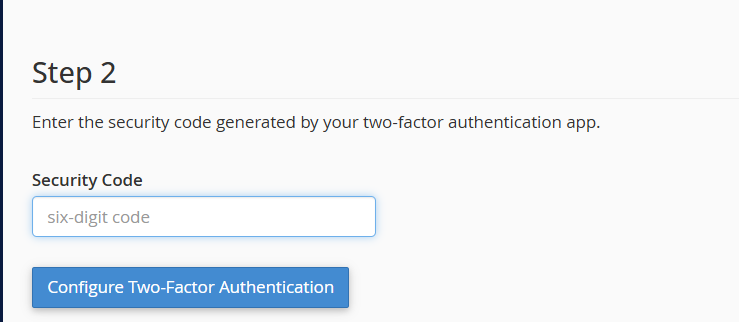
- Complete the Setup
Once your app is configured, it will generate a six-digit code. Enter this code into the Security Code field in cPanel, then click Configure Two-Factor Authentication. A confirmation message will appear to indicate that 2FA has been successfully enabled.
Logging in with 2FA Enabled
From now on, every login to cPanel will require both your password and the temporary code generated by your authenticator app. Remember that the code refreshes every 30 seconds, so you need to enter it promptly. If the code expires, simply generate a new one using your app.
Disabling Two-Factor Authentication
If you ever need to disable 2FA, log in to cPanel, go to Security > Two-Factor Authentication, and click Remove Two-Factor Authentication. Confirm the removal to deactivate 2FA.
Lost Access to Your Authenticator App
If you lose access to your authenticator app, for example due to a lost or replaced device, contact our support team to temporarily disable 2FA. Once disabled, you can log in to cPanel and set up 2FA again on your new device.
Additional Tips
When setting up 2FA, some hosting platforms offer backup codes. If your authenticator app isn’t working, these codes can help you get back in. Store them somewhere safe. Additionally, to guarantee that generated codes are valid, make sure the date and time on your device are accurately synchronized.
One easy yet very powerful way to improve account security is to enable Two-Factor Authentication in cPanel. Despite the additional step it adds to the login process, the security it offers against unwanted access makes the effort worthwhile.